What is Auraglow Teeth Whitening?
Auraglow teeth whitening is a popular at-home teeth whitening system designed to brighten your smile. It typically involves a combination of whitening gel and an LED light to accelerate the whitening process. Auraglow offers various kits, each containing the necessary components to remove stains and discoloration from your teeth. This guide will provide you with clear and concise Auraglow teeth whitening directions, helping you achieve a brighter, more confident smile from the comfort of your home. The system is known for its ease of use and effectiveness in combating stains caused by coffee, tea, wine, and other common sources.
Understanding the Auraglow Kit Contents
Before you begin, familiarize yourself with the contents of your Auraglow kit. Most kits include a whitening gel, typically containing a percentage of hydrogen peroxide or carbamide peroxide, a mouth tray or trays, an LED light, and a shade guide to track your progress. Some kits also include a desensitizing gel to reduce any potential sensitivity. Carefully review the instructions provided with your specific kit, as contents and directions may vary slightly depending on the product purchased. Check that all components are present and in good condition before starting the whitening process. A complete kit ensures you have everything needed for a successful and safe whitening experience.
Teeth Whitening Tray Preparation

Prepare the mouth tray before your first whitening session. Some Auraglow kits offer pre-molded trays, while others require you to mold the trays to fit your teeth. If your kit includes moldable trays, follow the instructions to soften the trays, typically by immersing them in hot water for a specific duration. Once softened, carefully place the trays over your upper and lower teeth, biting down gently to create a custom fit. Ensure the trays fit snugly against your teeth to prevent the gel from leaking and to maximize contact with the tooth surfaces. Trimming any excess material from the trays can also improve comfort and ensure a better fit. This step is crucial for an effective and comfortable whitening experience.
How to Use Auraglow Whitening Gel
The Auraglow whitening gel is the core of the whitening process. The gel’s active ingredients break down stain molecules on your teeth. Proper application is critical for optimal results. Start by brushing your teeth thoroughly before each treatment, but do not use toothpaste. Use a dry toothbrush. This step removes any surface debris, ensuring that the whitening gel can effectively penetrate the enamel. After brushing, dry your teeth and follow the specific instructions provided with your Auraglow kit for applying the whitening gel to the trays. Usually, a small amount of gel is applied to the inner surface of each tray, enough to cover the visible surfaces of your teeth when the tray is in place.
Applying the Whitening Gel
Carefully apply the whitening gel to the mouth trays. Avoid overfilling the trays, as excess gel can lead to gum irritation. Apply a thin, even layer of gel to the front surfaces of the tray where your teeth will be. Once the gel is applied, insert the trays into your mouth, ensuring they fit snugly against your teeth. Gently press the trays to ensure proper contact between the gel and the tooth surfaces. Remove any excess gel that spills over the trays with a clean cotton swab. The correct application ensures the whitening agent comes into contact with your teeth, facilitating the stain removal process. Be mindful of the amount of gel used to avoid discomfort and potential side effects.
Using the LED Light

The LED light is a key component in accelerating the whitening process. After inserting the trays with the whitening gel, position the LED light close to your teeth. The light activates the gel, boosting its whitening effect. Ensure the light is properly aligned with the trays and follow the recommended treatment time specified in your Auraglow kit instructions. The light is typically turned on for a certain amount of time, usually around 10 to 30 minutes, depending on the kit and desired results. The LED light enhances the whitening gel’s ability to break down stains, leading to quicker and more effective results. Regularly using the LED light as instructed is essential for achieving the best outcome.
The Treatment Duration and Frequency
Adhere to the recommended treatment duration and frequency outlined in your Auraglow kit instructions. The typical treatment duration may range from a few days to several weeks, depending on your desired level of whitening and the intensity of the stains. Avoid exceeding the recommended treatment time to minimize the risk of side effects such as tooth sensitivity or gum irritation. Consistency is key; follow the recommended frequency to see noticeable results. Regularly track your progress with the shade guide provided in your kit to monitor the effectiveness of the treatment. Patience and consistency ensure you achieve optimal results without risking oral health problems.
Aftercare Tips for Auraglow Whitening
After each whitening session, rinse your mouth thoroughly with water to remove any remaining gel. Clean the mouth trays with lukewarm water and soap, and store them in a clean, dry place. Avoid consuming foods and drinks that can stain your teeth, such as coffee, tea, red wine, and dark-colored berries, for at least an hour after each treatment. Consider using a desensitizing toothpaste if you experience any tooth sensitivity. Maintain good oral hygiene practices by brushing twice a day and flossing regularly. Following these aftercare tips can help maintain your results and keep your smile bright.
Maintaining Your Results

To maintain your bright, white smile, incorporate the following habits. Minimize your intake of stain-causing foods and drinks. Continue to practice excellent oral hygiene, including regular brushing and flossing, to prevent new stains from forming. Schedule regular dental check-ups and cleanings. Consider using a whitening toothpaste or a touch-up treatment with the Auraglow kit every few months to maintain your results. Proper maintenance helps prolong the life of your white teeth and allows you to enjoy your beautiful smile for a long time.
Possible Side Effects and How to Manage Them
Some individuals may experience temporary side effects during the teeth whitening process. The most common side effects include tooth sensitivity and mild gum irritation. If you experience tooth sensitivity, try using a desensitizing toothpaste before and after your whitening treatments. Avoid using the whitening gel for a few days if the sensitivity becomes severe. For gum irritation, make sure the whitening gel does not come into contact with your gums. If irritation persists, consult your dentist. Most side effects are temporary and resolve within a few days. Being aware of these potential effects helps you address any issues promptly and ensures a more comfortable experience.
Auraglow Teeth Whitening Results
Auraglow teeth whitening offers noticeable results in a relatively short period. The degree of whitening varies from person to person depending on the type and severity of stains, as well as the initial shade of your teeth. You can expect to see a significant improvement in the whiteness of your teeth, often several shades lighter on the shade guide. However, results are not permanent, and maintenance is essential to keep your teeth looking their best. Consistent use of the Auraglow kit, coupled with proper oral hygiene and dietary choices, will ensure that you enjoy a brighter, more confident smile.
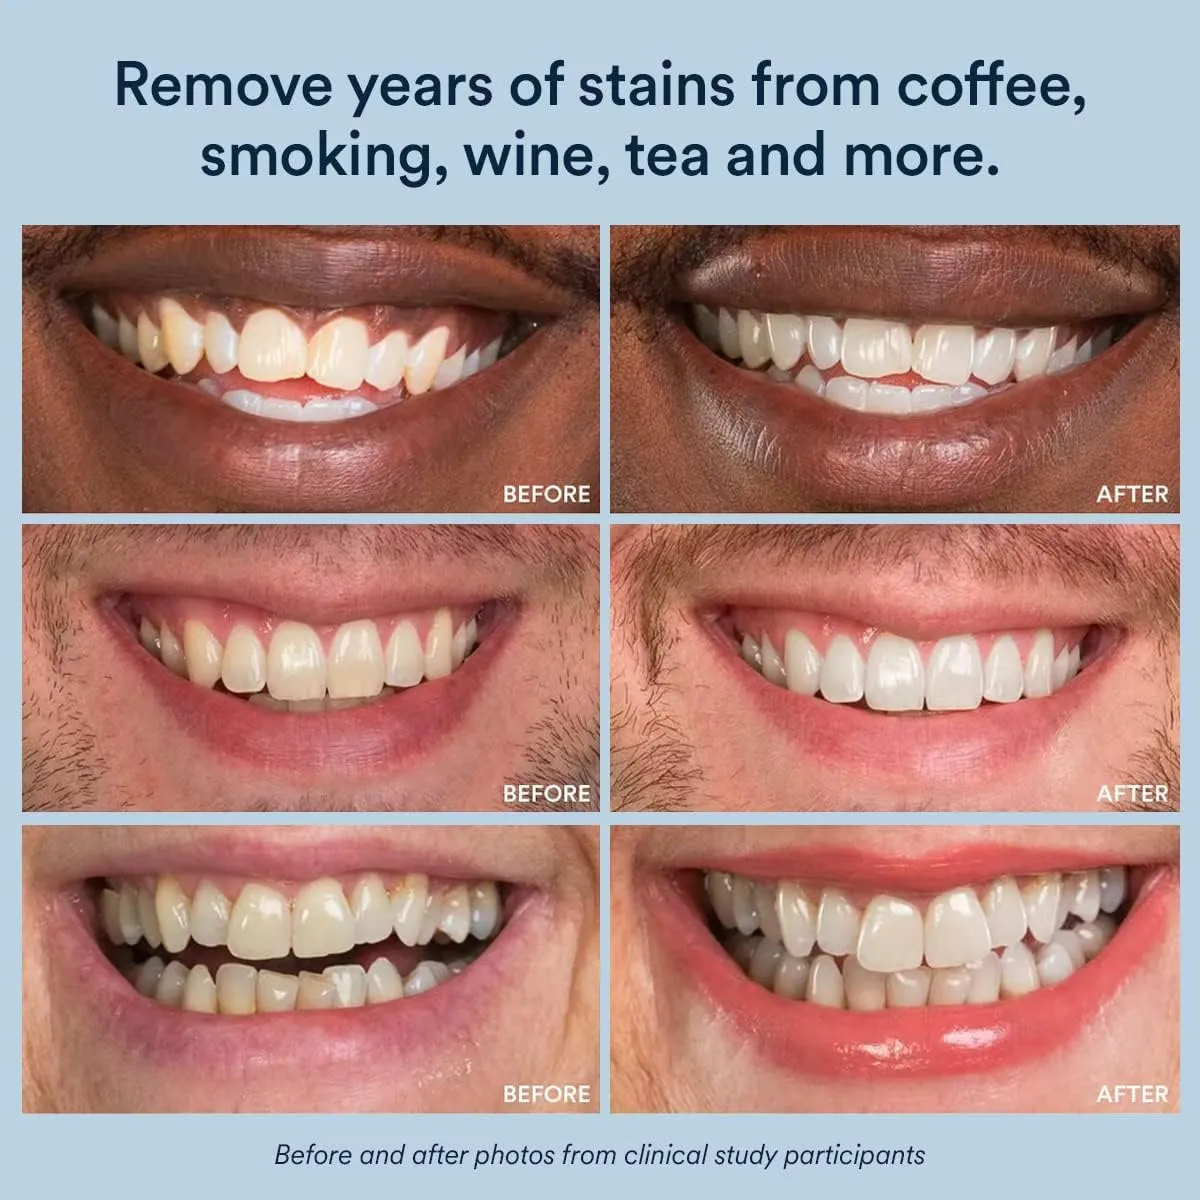
Before and After

Visual results often speak volumes. Before and after images showcase the transformative effects of Auraglow teeth whitening. These images demonstrate the effective removal of stains, leaving a significantly brighter and more appealing smile. You can find numerous before-and-after examples online or in Auraglow’s marketing materials. These visual aids provide a clear indication of the potential outcomes, giving you a realistic view of what you can achieve with Auraglow. These photos can also serve as inspiration, motivating you throughout the whitening process. Comparing your teeth with the before-and-after pictures can show how your teeth have improved over time.
Auraglow vs Other Teeth Whitening Options
Compare Auraglow to other teeth whitening options, such as professional whitening treatments in a dentist’s office, over-the-counter whitening strips, and whitening toothpastes. Professional whitening offers faster results and may be more effective for stubborn stains, but it is also more expensive. Whitening strips are convenient but may not provide the same level of whitening as Auraglow. Whitening toothpastes are useful for removing surface stains but are generally less effective for significant whitening. Auraglow offers a balance between convenience, effectiveness, and cost, making it a popular choice for at-home teeth whitening. Consider your personal needs, budget, and expectations when selecting the best teeth whitening solution.